 I have been lucky enough to part of the Design Team at Just Add Ink for the past few months. The work of the Design Team has been so inspirational each week. This week at Just Add Ink we are hosting our first ever Blog Hop! Before I get into my post, here are a few details about what's happening... There are 10 stops on our Blog Hop (Just Add Ink and each of our 9 Design Team members), but the hop is set up in a loop so it doesn't matter where you start. All you need to do to follow along is click the blog hop button at the end of each post and you'll be taken to the next stop! This week's Just Add Ink challenge incorporates ideas from the tutorials you will see along the way. So the challenge is for you to Just Add... A Technique From The Blog Hop. Easy! There are 9 fantastic techniques to choose from (with a tutorial to match); the hard part will be making the choice! Add your entry to the Just Add Ink blog as normal.
Thanks for joining in the Just Add Ink blog hop. I hope you are enjoying yourself so far. The technique I am showing today is Emboss Resist. This technique is so easy to do and you can achieve some fantastic results. It also gives you great mileage on your stamps, as you produce a totally different look to regular stamping and embossing. Here we go:
Materials you will need
*Plain cardstock or DSP
(I have used Whisper White)
*Stamps (I have used Always)
*Versamark pad
*Embossing powder (I have used clear)
*Your choice of ink pad colours
(I have used Real Red, Tangerine Tango and Chocolate Chip)
*Blender pens
*Heat tool
*Sponge daubers
*Tissue or soft cloth
 Step 1
To do emboss resist you start as you would with regular heat embossing. Using your Versamark ink, stamp your image onto cardstock (if you have an embossing buddy you can give your cardstock a rub over before applying your Versamark).  Step 2Pour embossing powder over your cardstock to cover your stamped image, then tap the excess powder off your card. For a neat result, ensure the powder covers only the stamped image. (*Note: My upline Alex gave me a wonderful tip for storing embossing powders in clear plastic containers. You can keep a plastic spoon inside your container for pouring the powder over the cardstock whilst you hold the cardstock over the container. The excess powder can then be tapped straight back into its container - no mess!!).
 Step 3Making sure your heat tool is hot, hold it in front of your cardstock, (approximately 10-15cm is good). Heat the embossing powder until you see it change from powdery to glossy all over the image. Be careful not to hold the heat tool there for too long or you will scorch your cardstock and your fingers!!
 Step 4 Use a sponge dauber to apply ink over and around your embossed image. You can apply your ink by dabbing or swirling, depending on the effect you want. I have used swirling motions to blend the ink over the embossing. For my image I have added some Chocolate Chip highlights to some of the flowers using my blender pen. If you use clear embossing powder and a patterned paper, you will be able to see the pattern through the embossed image. To finish off your emboss resist neatly, use your tissue or cloth to polish the excess ink of the embossing. The result will be a bright, sharp emboss resist image.
  Emboss resist images make beautiful focal points on your cards or as embellishments on scrapbook layouts. I'd love to see what you come up with when you try the emboss resist technique.
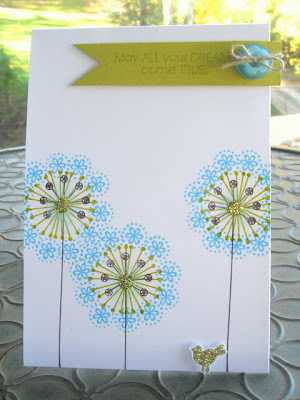
  Here is the card and gift box I made with the emboss resist image from my tutorial, as well as some other examples:


I hope you have enjoyed my tutorial and I'm looking forward to seeing your emboss resist projects. Next on the Just Add Ink blog hop you'll be visiting the very creative Tania Gould. Just click on the button below to head to Tania's blog.

Thanks again for participating in the Just Add Ink blog hop!
Nicole


